
To test water quality, first decide what question the test must answer. Drinking-water safety, wastewater process control, aquaculture and river monitoring require different parameters and methods. Choose the tests, arrange correct sampling, calibrate suitable instruments, measure under controlled conditions and interpret the results against the requirements for that specific use.
1. Start with the water source and intended use
On a phone, swipe comparison tables sideways to see every column.
| Your purpose | Useful starting questions | Appropriate next step |
|---|---|---|
| Household drinking water | Public supply or private well? Is there a known local contaminant, plumbing concern or official notice? | Review the supplier’s report where available and ask the relevant authority or qualified laboratory which contaminant tests and sampling method are needed. |
| Wastewater or industrial process | Which treatment stage or process decision is being controlled? | Choose indicators such as pH, DO, conductivity or turbidity for process control, plus the laboratory analyses and approved methods required for discharge or reporting. |
| Aquaculture | Which species, life stage, temperature, salinity and stocking conditions apply? | Define the required monitoring plan for DO, pH, temperature and relevant nitrogen compounds with the operator or specialist. |
| River, lake or groundwater monitoring | Are you investigating a trend, a location difference or a specific pollution source? | Define representative sites, depth, timing, field measurements and laboratory samples before collecting data. |
| Treatment performance such as RO | What is the feed-water condition and the treatment acceptance criterion? | Compare appropriate upstream/downstream measurements on a consistent basis; conductivity trends alone cannot identify every contaminant. |
The US EPA recommends state-certified drinking-water laboratories for US drinking-water analyses. Other countries use their own approved or accredited systems. A US reference is not a universal legal standard: identify the region, water use and applicable method before choosing acceptance limits.
2. Choose parameters that answer the question
| Parameter or test | What it can help assess | What it cannot establish alone |
|---|---|---|
| Temperature | Measurement context, process changes and interpretation of several other parameters. | Overall chemical or microbiological safety. |
| pH | Acid/base condition and process changes. | Total alkalinity, a specific contaminant concentration or drinking-water safety. |
| Conductivity / EC | Changes in dissolved ionic material and treatment trends. | Which ions are present, microorganisms or a universal TDS value. |
| Turbidity | Optical effects of particles and changes in clarification or filtration. | A universal suspended-solids mass or absence of pathogens. |
| Dissolved oxygen | Oxygen conditions for ecological or treatment-process monitoring. | Bacterial safety, metals or the total pollutant concentration. |
| Disinfectant residual, nutrients or other field chemistry | A specific analyte when an appropriate validated test is used. | A full contaminant screen; interferences and method limits still apply. |
| Microbiology, metals and specified contaminants | Targeted laboratory analyses using suitable methods and quality controls. | Every possible contaminant unless the testing scope actually includes it. |
| COD, BOD and solids | Wastewater or environmental assessment under a defined method. | Interchangeable values: optical estimates and laboratory reference tests require appropriate validation. |
A handheld TDS meter commonly estimates concentration from conductivity using a configured factor. A low TDS or turbidity reading does not prove water is safe to drink. If the purpose is drinking-water safety, obtain the required contaminant tests rather than relying on a multi-parameter meter alone.
3. Arrange sampling before collecting the water
- Ask the laboratory which tests, containers, preservatives, sample volumes, holding times and transport conditions apply. Obtain its sampling instructions before collection.
- Select a sampling point that represents the question. Source water, treated water, a kitchen tap and a process tank may require different procedures.
- Label each sample with an identifier, location, date, time and requested tests. Follow any chain-of-custody requirements.
- Use the supplied or specified container. Do not rinse a sterile or pre-preserved bottle unless the laboratory expressly instructs it.
- Follow the test-specific instructions for tap preparation, flushing, first-draw collection, cooling and delivery. One collection procedure cannot suit both a microbiological test and every metals test.
- For field measurements, document location, depth, flow and conditions. Some properties change rapidly after collection, so use in-situ measurement when the method requires it.
Avoid transferring samples between improvised containers or adding household disinfectants. A good instrument cannot repair a contaminated, unrepresentative or incorrectly preserved sample.
4. Check and calibrate field instruments
Match each sensor and range to the sample. Inspect the sensing surface, cables and consumables; use compatible fresh standards and the calibration procedure for the actual model. Then verify the instrument with an appropriate check before trusting a process or environmental result.
| Instrument | Before measurement | During measurement |
|---|---|---|
| pH meter | Select the correct buffer family and calibration points; check electrode condition and temperature input. | Keep the sensing membrane and reference junction immersed, allow stability and record temperature. |
| Conductivity meter | Confirm cell constant, range, standard and temperature-compensation basis. | Avoid trapped bubbles, contamination and incomplete immersion; record the full unit and reference temperature. |
| Turbidity meter | Check optics, standards, unit and method. | Handle vials or installed optics as directed; control bubbles, settling and stray light. |
| DO meter | Check membrane or optical cap, startup, calibration reference, pressure and salinity settings. | Choose representative water and avoid trapped bubbles or a misleading aerator plume; meet model-specific flow requirements. |
| Chemical test kit | Check analyte, expiry, interferences, sample volume and reaction time. | Follow the specified sequence and timing; an out-of-range color result needs an appropriate follow-up method. |
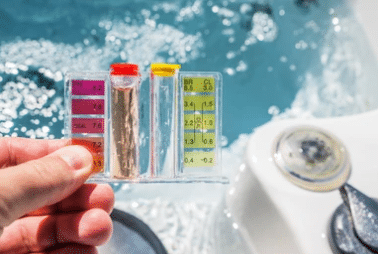
For detailed instrument workflows, use the pH sensor calibration and troubleshooting guide, conductivity unit converter, turbidity measurement guide and DO sensor selection and calibration guide.
5. Measure and record enough context to interpret the result
- Use the defined sample point and consistent technique. Prevent cross-contamination between standards and samples.
- Allow the reading to stabilize under the applicable method rather than recording the first number displayed.
- Record the result with its complete unit, instrument and sensor identity, calibration/check status, temperature and relevant compensation settings.
- Record unusual conditions such as rainfall, treatment changes, aeration, color, odor, foam or recent cleaning without treating those observations as a contaminant diagnosis.
- Repeat or independently verify an unexpected result using the relevant quality-control procedure. Keep the original observation and the reason for any rejection.
| Example field record | What to enter |
|---|---|
| Sample identity | Site, depth or tap; date and time; collector. |
| Measurement | Parameter, value, full unit and temperature. |
| Instrument | Meter/sensor model or identifier; range and method. |
| Quality checks | Calibration date, standards and verification result. |
| Settings and conditions | Conductivity reference temperature; DO pressure/salinity inputs; flow and other relevant observations. |
6. Interpret results against the correct requirement
Compare the result with a requirement that states the region, intended use, analyte, unit, method and sampling point. Check whether the laboratory result is above a reporting limit or reported as “less than” a limit. Different methods or units can explain apparent disagreement; do not average incompatible measurements to produce a reassuring number.
If a drinking-water result exceeds an applicable requirement or conflicts with an official notice, follow the laboratory, water supplier or relevant authority’s instructions for that specific finding. Selecting a treatment requires identifying the contaminant and the appropriate validated treatment; an online instrument reading alone is insufficient.
Example: a repeatable treatment-monitoring visit
For an illustrative treatment check, define the same upstream and downstream sample locations and record operating conditions. Verify the meters, then measure temperature, pH, conductivity and any process-specific turbidity or DO parameter. Compare matched measurements using the same temperature basis and method. Collect separate laboratory samples when the monitoring plan requires them. This workflow illustrates a testing plan; it does not replace a drinking-water compliance assessment or supply invented field results.
Choosing Apure instruments for the plan
Use pH/ORP, conductivity/TDS, turbidity and dissolved oxygen instruments for the defined measurements. For nutrients or wastewater loads, first confirm the required analyte and method before considering nitrate/nitrite, COD or BOD monitoring options. Confirm sensor compatibility and verification needs for the actual application.
A published wastewater monitoring example
Apure’s published Jinan and Shiyan wastewater project account describes continuous multiparameter monitoring alongside plant operation. For a similar task, define the sampling point and parameters, document sensor cleaning and verification, and compare online readings with a time-matched reference sample. Keep reference-method and online results separately identified.
This is a deployment example, not a raw measurement dataset or a calibration certificate. The project summary does not replace the original sample logs, reference methods and quality-control records needed to assess individual results.
What to record for a defensible water-quality result
- Sample: site, sampling point and depth, date and time, sample identifier, collection method and relevant process conditions.
- Instrument: sensor model and serial number, controller, measurement method, unit, range and active compensation settings.
- Quality checks: standard identifier and expiry, calibration date, before-adjustment reading, adjustment performed, after-adjustment reading and a separate verification result against stated acceptance limits.
- Result: stable measured value, sample temperature, operator, cleaning performed, observed interferences and any out-of-range or rejected result.
- Reference comparison: matched sample time, laboratory method and report identifier, preservation and holding conditions where applicable, and the basis for accepting or investigating a difference.
Use these fields as a record checklist. Enter actual observations from the test; blank fields and illustrative calculations must not be presented as field measurements.
Frequently asked questions
Can I test all water quality at home?
No single home kit measures every relevant contaminant. Field tools can answer selected questions, but drinking-water contaminant testing may require a qualified laboratory and test-specific sampling.
How often should water be tested?
Use the frequency required by the applicable monitoring plan, authority or process risk. A one-time test cannot describe every seasonal or operational condition. Changes in source, flooding, treatment or an unexpected trend may require additional testing under the relevant guidance.